Fall foliage photography is one of the most popular and competitive niches in nature photography – and getting truly exceptional results requires more than just showing up when the leaves change. The difference between a forgettable autumn snapshot and a frame-worthy fall image often comes down to gear choices, timing, and knowing how to work the conditions. This guide covers the best gear for fall foliage photography in 2026 and the techniques that separate memorable images from the millions of similar shots taken every autumn.
Fall photography rewards preparation and punishes passivity. The peak window at any given location is typically 7–10 days, and within that window, the best conditions – fog, rain, perfect golden hour backlight – may appear for only a few hours. Having the right gear ready, knowing your locations in advance, and understanding which techniques produce the best results in foliage conditions is the difference between a great portfolio and a mediocre one.
When Does Fall Foliage Peak?
Timing varies dramatically by region and elevation. As a general guide for the United States:
- Northern Michigan, Minnesota, Maine: Late September – early October
- New England (Vermont, New Hampshire): Early to mid-October
- Great Smoky Mountains (TN/NC): Mid to late October
- Blue Ridge Parkway (VA/NC): Late October – early November
- Pacific Northwest: October into November at lower elevations
Monitor foliage trackers (SmokyMountains.com runs the best for the Southeast; the USFS and state tourism boards publish regional updates) and plan to be on location for 3–5 days centered on the predicted peak. Foliage peaks move 3–5 days earlier for every 1,000 feet of elevation gain – scout a location at higher elevation first, then work downslope as the season progresses. This approach effectively extends your shooting window at a single destination by 2–3 weeks.
Weather matters as much as timing. Rain, frost, and wind all affect foliage differently. Frost accelerates color development and kills leaves quickly. Heavy wind strips leaves from trees. Rain saturates colors and produces fog, mist, and reflections that create exceptional photography conditions – but also muddy trails and slippery overlooks. Build weather awareness into your planning and be prepared to move quickly when ideal conditions emerge.
Best Camera Bodies for Fall Foliage Photography
Fall foliage is primarily a landscape photography discipline – resolution and dynamic range matter more than burst rate or AF speed. High resolution lets you crop tightly into a distant tree line of color, produce large prints, and capture fine texture in leaf details. Dynamic range allows you to recover blown highlights in a bright sky while retaining shadow detail in a shaded forest floor – a common exposure challenge in autumn light.
- Sony A7R V (61MP) – The resolution benchmark. At 61MP, a single frame contains more detail than most print sizes require, and the dynamic range at base ISO is extraordinary. Its Pixel Shift Multi Shooting mode produces 240MP composites for truly large-format output – a compelling option for wall prints from fall scenes.
- Nikon Z8 (45MP) – The balance of resolution, dynamic range, and speed that makes it a versatile all-around choice. At 45MP with Nikon’s excellent EXPEED 7 processing, it produces files that handle aggressive post-processing without falling apart.
- Canon EOS R5 Mark II (45MP) – Canon’s 45MP flagship. The Dual Pixel AF and IBIS combination performs well for handheld landscape work, and its color science renders autumn tones with a warmth many photographers find pleasing straight out of camera.
Do you need a high-resolution body? Not necessarily – a 24MP camera produces files perfectly sufficient for web use and prints up to 20×30 inches. But if large-format printing or heavy cropping is part of your workflow, the resolution jump to 45–61MP is genuinely meaningful for landscape work.
Best Lenses for Fall Foliage
Wide-Angle: 16–35mm for Forest Canopies and Vistas
Wide-angle lenses work beautifully in two foliage scenarios: looking up into a forest canopy of color (where ultra-wide creates dramatic converging lines and immersive framing) and sweeping overlook vistas where you want foreground-to-horizon depth. At 16mm, you can place a single colorful maple in the foreground with a valley of color behind it and achieve front-to-back sharpness with a small aperture and focused distance near the hyperfocal point.
- Sony FE 16–35mm f/2.8 GM II – The premium Sony option: f/2.8 aperture is useful for misty low-light dawn shots, and the optical quality handles the high resolution of the A7R V without compromise. A significant investment but one that serves every landscape scenario.
- Nikon Z 14–30mm f/4 S – Nikon’s compact wide zoom is a revelation: sharp, lightweight, and with a flat front element (no bulging front lens) that takes standard 82mm filters – directly relevant for the CPL and GND filters essential for fall foliage work.
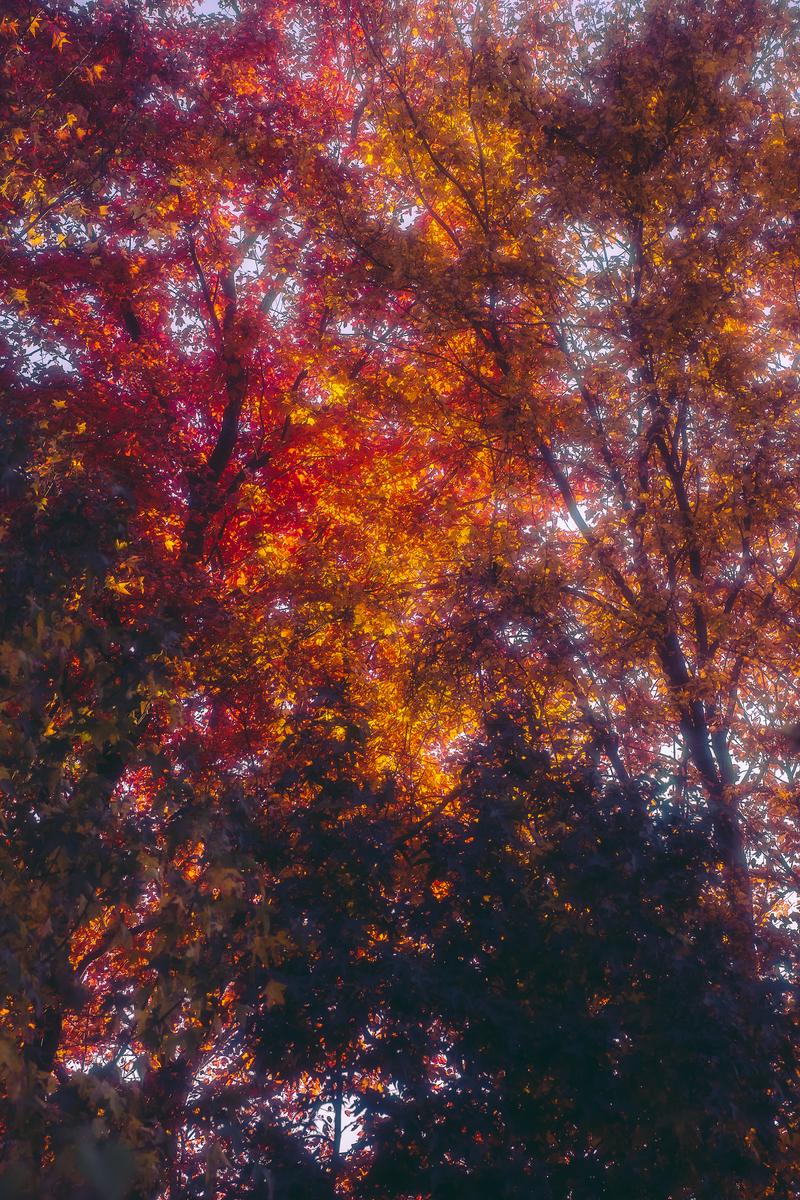
Shooting the forest canopy: Lie on your back below a colorful tree and point straight up. Frame with a small opening of blue sky at center. At 16mm and f/8, everything from the bark above you to the sky will be sharp. This perspective creates an immersive image that reads immediately as a forest interior. Early morning light filtering through the canopy adds drama – position yourself so the light source is at the edge of the frame rather than directly above.
Telephoto Compression: 70–200mm for Layered Color
Telephoto lenses are underused in fall foliage photography. They compress perspective – stacking layers of trees at different distances into a dense wall of color that reads as far more intense than the scene appeared to the naked eye. From a hillside or overlook, a 200mm shot into a valley of peak color often produces the most dramatic and shareable foliage images.
- Sony FE 70–200mm f/2.8 GM II – Sony’s benchmark telephoto zoom. Exceptional sharpness, reliable OSS, and f/2.8 aperture for separating a single brilliantly-lit tree against a blurred background of complementary color.
- Nikon Z 70–200mm f/2.8 VR S – Nikon’s professional telephoto zoom. The VR S stabilization works well for handheld shooting from overlooks where tripod setup is impractical, and the image quality handles full-resolution Nikon Z8 files without compromise.
At 200mm and f/4–f/5.6 from a distant hillside, layers of hills covered in fall color compress into a tapestry effect. Focus on the mid-ground layer that has the most saturated color. Shoot just after a rain – wet leaves are more saturated than dry ones and create specular highlights that add dimension to the image.
Filters: Essential for Fall Foliage
Circular Polarizer (CPL)
A circular polarizer is arguably the most important filter for fall foliage photography. It eliminates specular reflections from leaf surfaces – the glaring, washed-out highlights that desaturate autumn colors in direct or overhead sunlight. With a CPL rotated to maximum polarization, reds become deeper, yellows more intense, and blues pop dramatically behind the color. The difference before and after is often more dramatic than any Lightroom saturation adjustment.
The B+W XS-Pro Nano CPL is a high-quality option with a nano coating that resists smearing and makes it easy to clean – important when hiking to foliage overlooks in wet autumn weather. CPLs work best when the sun is at roughly 90 degrees to your shooting direction. They have minimal effect when shooting directly toward or away from the sun.
Graduated ND Filter
Fall foliage scenes often present a challenging dynamic range problem: a bright sky with clouds against a darker tree-covered hillside. A graduated ND filter darkens the sky to bring it within range of the foreground exposure, allowing a single correctly-exposed frame. The Lee Filters Soft GND 0.9 (3-stop) is a 3-stop soft-edged graduated filter – the “soft” edge blends naturally across an irregular treeline horizon without producing the hard line artifact that a sharp-edged GND creates over non-flat horizons.
In practice, many landscape photographers now handle dynamic range in post-processing with exposure blending or luminosity masking in Photoshop, avoiding physical GNDs entirely. But for single-shot captures or photographers preferring a film-based workflow, a GND remains a valuable field tool.
Tripod and Support
Fall foliage photography benefits enormously from a tripod. Long exposures for moving water (silky waterfalls below foliage) require one. High-resolution sensors at ISO 100 reward the extra sharpness that tripod-mounted shooting provides – even small camera shake is visible at 100% on a 61MP file. And careful composition – adjusting the height and angle of your frame to precisely place a colorful branch – becomes much easier with the stability a tripod provides.
The Vanguard Alta Pro 2+ 263AB100 is well-suited to foliage work: its multi-angle center column allows tilting to low angles near the ground without requiring you to splay the legs into wet leaf litter, and its 263mm height range covers overlook shooting and ground-level compositions with equal ease. Weight and pack size matter for hikes to remote foliage locations – carbon fiber models from Gitzo and Benro reduce carry weight significantly if multi-mile hikes are part of your workflow.
Best Locations for Fall Foliage Photography in the US
The most iconic fall foliage destinations reward early arrivals and weekday shooting – peak weekend crowds at Vermont’s Northeast Kingdom or Acadia National Park can make composition and parking near impossible. The less-visited alternatives often produce stronger images with less competition:
- Upper Peninsula of Michigan: Birch and maple with dramatic Lake Superior shoreline backdrops. Less crowded than New England, often earlier peak (late September). Pictured Rocks National Lakeshore is particularly outstanding.
- Ozark Highlands (Arkansas/Missouri): Underrated hardwood forest with dramatic ridgelines. Peak in mid-October. Dramatically fewer visitors than New England equivalents.
- Columbia River Gorge (Oregon/Washington): Bigleaf maple and vine maple against basalt canyon walls, often with dramatic waterfalls. Mulltnomah Falls corridor is crowded; the surrounding forest offers solitude.
- Adirondacks (New York): Massive hardwood forest with 3,000+ lakes. Arguably the largest contiguous fall foliage region in the country. Blue Mountain Lake area and the High Peaks region both peak in early October.
Fall Foliage Photography Techniques
Shoot After Rain
Rain transforms fall foliage photography. Wet leaves saturate 20–30% more intensely than dry ones, puddles create mirror reflections of canopy color, fog settles in valley hollows, and the light is softer and more even after a storm passes. Plan to shoot the morning after rain events – not during, when muddy conditions and gray flat light rarely produce compelling images. The window immediately after rain clears (especially the 30–60 minutes before full clearing when dramatic clouds remain) is often the single best foliage photography condition of the season.
Backlight the Leaves
Leaves are semi-translucent. When backlit by low-angle sun – particularly during the first hour after sunrise or before sunset – they glow with a luminous quality impossible to achieve in front-lit conditions. Position yourself with the sun behind your subject and expose for the backlit leaves. The background (in shadow) will go dark, making the lit leaves pop dramatically. A single maple or aspen branch against a dark evergreen background is a classic fall foliage composition using this technique.
Lens flare management matters when shooting toward the sun: a deep lens hood minimizes flare, shooting at f/11 or smaller creates sunstars (which can be used deliberately as a compositional element), and shielding the lens from direct sun with your hand or a flag when the sun is near the edge of the frame preserves contrast in the image.
Include Moving Water
Waterfalls, streams, and rivers surrounded by fall foliage are among the most popular and commercially successful nature photography subjects. Moving water adds a dynamic element to what could be a static scene, and the long exposures required (1–4 seconds for silky water) require a tripod, which also allows precise composition. Shoot at ISO 100, f/11, and let the shutter fall to the seconds range. A CPL on the lens cuts reflections from the water surface and the wet rocks, revealing color below the surface. Overcast days produce the most even light for this subject – direct sun creates a high-contrast scene that’s difficult to expose correctly in a single frame.
Frequently Asked Questions
What camera settings should I use for fall foliage photography?
For static foliage landscapes on a tripod: ISO 100, f/8–f/11 for depth of field, shutter speed determined by the exposure (often 1/30s–2s in dawn light). For handheld shooting in good light: ISO 400, f/5.6–f/8, 1/250s or faster. Shoot RAW in all cases – fall colors benefit significantly from RAW processing to fine-tune white balance (which strongly affects whether leaves render as warm gold or cool orange), recover highlight and shadow detail, and adjust color calibration to separate reds, oranges, and yellows.
Does a polarizing filter help with fall foliage?
Yes – significantly. A circular polarizer removes specular reflections from leaf surfaces that desaturate color in bright light, and also deepens blue skies that appear behind foliage. The effect is strongest when the sun is at 90 degrees to your shooting direction. CPLs reduce exposure by 1.5–2 stops, so adjust your shutter speed or ISO accordingly, or use a tripod to accommodate the slower exposure.
What time of day is best for fall foliage photography?
The first and last hour of daylight (golden hour) produces the warmest, most directional light that makes foliage glow. For backlit leaf photography, position yourself with the sun behind your subject during these windows. Overcast days are excellent for forest interior and waterfall shots where even light prevents the harsh contrast of direct sun. Avoid midday shooting unless it’s overcast – the overhead sun bleaches color and creates unflattering flat light.
How do I plan a fall foliage photography trip?
Start by selecting a region and researching its typical peak window (use state tourism sites and foliage tracker services). Book accommodations 4–6 weeks in advance for popular destinations – Vermont and Acadia in peak season book out months ahead. Plan for 4–5 days on location centered on predicted peak. Scout locations the day before you shoot them – find your compositions, note sunrise/sunset directions, and identify parking and access. Build in flexibility to pursue unexpected conditions (fog, rain clearing, frost).
Should I use exposure bracketing for fall foliage photography?
Exposure bracketing (capturing the same frame at multiple exposures for HDR blending) is useful when the dynamic range exceeds what your sensor can capture in a single frame – common in direct sunlight with bright sky and shaded foreground. However, modern high-resolution mirrorless sensors handle 12–14 stops of dynamic range at base ISO, and careful RAW processing often recovers enough range without blending. Use bracketing when the sky is significantly brighter than the foreground and you want detail in both. On overcast days, a single well-exposed RAW frame is usually sufficient.
Browse more nature photography tutorials, gear reviews, and field tips.
Download our guide: exposure, ISO, and aperture strategies for every light condition and terrain.
We respect your inbox. One guide, occasional tips, unsubscribe anytime.
Related Guides
 How to Photograph the Milky Way: Settings, Planning & Post-Processing
 Mastering Long Exposure Photography: A Complete Guide to Silky Water & Dramatic Skies
 Best Tripods for Landscape Photography (2026): 7 Picks From Budget to Pro
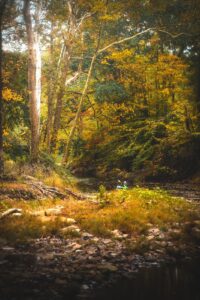 How to Photograph Waterfalls: Getting Silky Smooth Water with the Right Settings