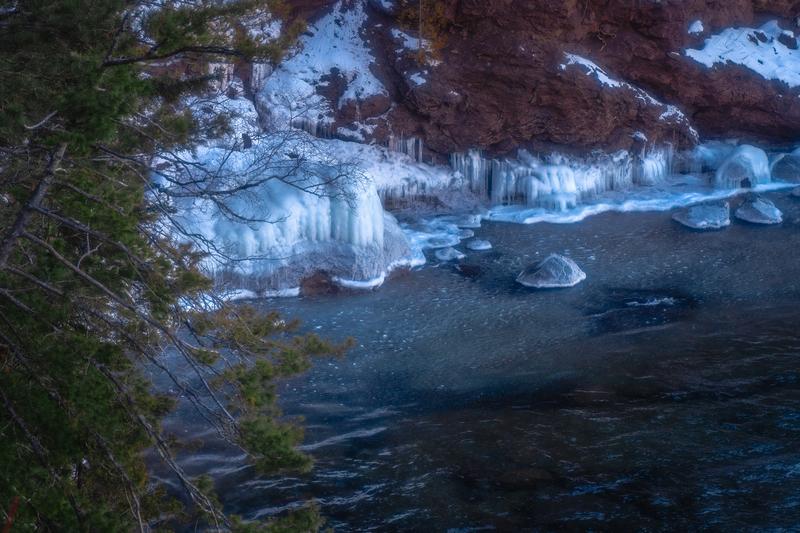
You are standing at the base of a waterfall. The spray is hitting your jacket. The light is good, maybe a bit bright. You want that smooth, silky water effect you have seen in landscape photos, but every time you press the shutter the water looks frozen and choppy. Here is exactly what to change.
Why You Need an ND Filter for Waterfalls
To blur moving water, you need a slow shutter speed. Somewhere between 1/4 second and 4 seconds gives you that silky effect. The problem is that in daylight, even at ISO 100 and f/16, your camera still wants to shoot at 1/250s or faster. That is way too fast to blur the water.
An ND filter is basically a piece of dark glass that sits in front of your lens. It reduces the amount of light reaching your sensor without affecting color. This lets you use a much slower shutter speed than you could otherwise.
ND Filter Stops Explained
ND filters are rated in stops of light reduction. Each stop cuts the light in half. So a 3-stop ND reduces light to 1/8 of what it was. A 6-stop ND reduces it to 1/64. A 10-stop ND reduces it to 1/1000.
Common ND filters for waterfall work come in three main strengths. A 3-stop ND (ND8) is good for low-light situations like overcast mornings. A 6-stop ND (ND64) is the most practical all-around choice. A 10-stop ND (ND1000) is ideal for bright sunny days when you want exposures of 10 to 30 seconds.
Step-by-Step: How to Use an ND Filter for Waterfalls
Step 1: Set Up Your Tripod
You cannot handhold a 1-second exposure. Get your tripod set up on stable ground. Point it at the waterfall and frame your shot before attaching the ND filter. It is much easier to compose without the dark filter on the lens.
Step 2: Set Your Base Exposure Without the Filter
Start at ISO 100. Set your aperture to f/8 or f/11. Put your camera in aperture priority and take a test shot. Note the shutter speed your camera chose. This is your starting point. Write it down or remember it.
Step 3: Calculate Your Filtered Exposure
Each stop of ND doubles your shutter speed. If your unfiltered exposure is 1/250s and you put on a 6-stop ND, you multiply by 64. That gives you roughly 1/4s, which is a great starting point for silky water.
Here is a quick reference. If your base shutter speed is 1/250s:
- 3-stop ND: 1/30s
- 6-stop ND: 1/4s
- 10-stop ND: 4 seconds
Step 4: Attach the Filter and Switch to Manual Mode
Once you know your target shutter speed, switch your camera to manual mode. Set ISO 100, your chosen aperture, and the calculated shutter speed. Attach the ND filter. Use your camera’s 2-second self-timer or a remote shutter release to fire the shot without touching the camera.
Step 5: Review and Adjust
Take your first shot and check the histogram. If it is clipped on the right, stop down by one step or use a faster shutter speed. If it is too dark, open up or add a stop to your exposure. Take a second shot and look at the water. If it looks like a choppy mess, you need a longer exposure. If it looks like a flat white sheet, try a faster shutter speed around 1/2 to 1 second.
Settings Reference Table for Waterfall ND Filters
| Situation | ND Filter | ISO | Aperture | Shutter Speed |
|---|---|---|---|---|
| Overcast / shady, low light | 3-stop (ND8) | 100 | f/8 | 1/2s – 2s |
| Partly cloudy, moderate light | 6-stop (ND64) | 100 | f/11 | 1/4s – 1s |
| Bright sun, midday | 10-stop (ND1000) | 100 | f/11 | 10s – 30s |
| Subtle motion, light blur | 3-stop (ND8) | 100 | f/8 | 1/8s – 1/4s |
| Completely silky smooth water | 6-stop or 10-stop | 100 | f/11 | 2s – 10s |
Tips for Getting Sharp Images with ND Filters
Long exposures magnify any camera movement. Use a tripod with all its legs extended and the center column down if possible. Lock your mirror up if you shoot with a DSLR. Even the vibration from the mirror flipping up can cause blur in 1-second exposures. Use live view mode to avoid this entirely on modern cameras.
Check your focus before attaching the ND filter. Most 10-stop NDs are too dark to autofocus through. Focus, then switch to manual focus to lock it in, then attach the filter.
Frequently Asked Questions
What is the difference between ND64 and ND1000?
ND64 blocks 6 stops of light and is best for morning or overcast light. ND1000 blocks 10 stops and is best for bright midday sun. ND64 gives you shutter speeds in the 1/4s to 2s range. ND1000 gives you exposures from 10 seconds to several minutes depending on the light.
Should I use a variable ND filter?
Variable ND filters are convenient because one filter covers a range of stops. However, many variable NDs add a cross-pattern or color cast at extreme settings. If you use one, stay away from the minimum and maximum ends of the range. Fixed ND filters from quality brands give cleaner results.
Do I need to use a filter for waterfall photography?
Not always. On a very overcast morning or in deep forest shade, your base exposure might already allow for a shutter speed of 1/4s or slower at ISO 100 and f/11. In those cases, you may not need a filter at all. But in normal daylight, you will almost certainly need one.
What size ND filter do I need?
Match the filter to your lens thread diameter, which is printed on the inside of your lens cap (look for a number followed by “mm” with a circle symbol). Common sizes are 67mm, 72mm, 77mm, and 82mm. Alternatively, buy a 100mm square filter system that fits multiple lenses with different adapter rings.
Does an ND filter affect color?
Cheap ND filters can add a color cast, often a slight blue or green tint. Quality filters from brands like Breakthrough Photography, Hoya, or B+W are color-neutral. Shooting in RAW makes any minor color cast easy to correct in post-processing.
Recommended Gear for Waterfall Photography
To get the most from your ND filter, pair it with a solid tripod and a camera that handles long exposures cleanly. Our guide to the best tripods for landscape photography covers stable options at every price point. For filter systems and how to choose polarizers alongside your ND filters, see our best camera filters for landscape photography review. If you want to go deeper on shutter speed techniques beyond waterfalls, our full guide to long exposure photography gear and techniques covers everything from star trails to light painting.
Browse more nature photography tutorials, gear reviews, and field tips.
Download our guide: exposure, ISO, and aperture strategies for every light condition and terrain.
We respect your inbox. One guide, occasional tips, unsubscribe anytime.
Related Guides
 Best Polarizing Filters for Nature Photography (2026): 6 CPL Filters Compared
 How to Photograph the Milky Way: Settings, Planning & Post-Processing
 Mastering Long Exposure Photography: A Complete Guide to Silky Water & Dramatic Skies
 Best Tripods for Landscape Photography (2026): 7 Picks From Budget to Pro