Quick Answer
Long exposure photography uses a slow shutter speed to blur motion, turning water silky, clouds into streaks, and lights into trails. The core recipe: mount the camera on a tripod, shoot in manual mode at base ISO (100) and a mid aperture (f/8 to f/11), then darken the scene with a neutral density (ND) filter so you can use shutter speeds from half a second to several minutes. Focus and compose first, then add the filter, use a remote release or self-timer, and meter carefully. A 6-stop and 10-stop ND plus a sturdy tripod cover almost every situation.
The first time you see a two-second exposure of a waterfall, it feels like a magic trick: the chaos of splashing water resolves into a smooth ribbon of silk, the rocks sharpen, and the whole scene gains a dreamlike calm no fast shutter can capture. Long exposure is how photographers paint with time. It is also one of the most approachable creative techniques in landscape photography once you understand the handful of settings and tools involved. This guide takes you from gear to in-the-field workflow to finishing in post.
What Long Exposure Photography Actually Does
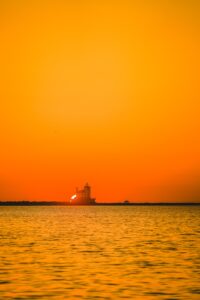
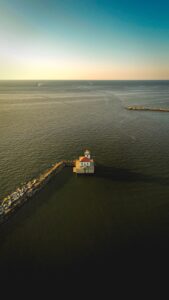
Your shutter speed controls how long the sensor collects light. Anything that moves during that window records as blur, while everything still stays sharp. A one-second exposure smooths rippling water; thirty seconds turns crashing surf into mist and drifting clouds into painterly streaks; several minutes can erase moving crowds from a scene entirely. The stationary elements, like rocks, buildings, and trees, stay crisp, creating a striking contrast between motion and stillness.
Gear You Need
A Sturdy Tripod
Non-negotiable. Any camera shake during a multi-second exposure ruins the shot. A stable tripod, ideally with the center column down and a bag hung for ballast in wind, is the foundation of every long exposure.
Neutral Density Filters
An ND filter is dark glass that reduces the light entering the lens without affecting color, letting you use slow shutter speeds in daylight. They are rated in stops: a 6-stop ND (ND64) is ideal for silky water in shade or soft light, while a 10-stop ND (ND1000) enables minute-long exposures and dramatic cloud movement even in brighter conditions. A 3-stop is handy for subtle waterfall blur. Many landscape photographers carry all three or use a variable ND for flexibility.
Remote Release or Self-Timer
Pressing the shutter button shakes the camera. Use a cable or wireless remote, or the two-second self-timer, to fire vibration-free. For exposures longer than 30 seconds you will also need bulb mode and a remote with a lock or timer.
Step-by-Step Long Exposure Workflow
1. Compose and Focus First
Set up your composition and achieve focus before attaching a dark ND filter, because a 10-stop filter makes the viewfinder nearly black and autofocus unreliable. Once focused, switch the lens to manual focus so it does not hunt when you add the filter.
2. Take a Base Exposure
Without the filter, dial in a correct exposure at ISO 100 and f/8 to f/11. Note the shutter speed; this is your starting point for the math.
3. Add the Filter and Recalculate
Each stop of ND doubles the exposure time. If your base exposure was 1/15s and you add a 10-stop filter, the new time is roughly 60 seconds. Most photographers use a long-exposure app or a simple chart to convert, or simply set the camera to bulb and time it.
4. Block the Viewfinder
On DSLRs, light leaking through the optical viewfinder during a long exposure can fog the image. Cover it with the supplied eyepiece cap or a hand. Mirrorless cameras are immune to this.
5. Fire and Review
Trigger with your remote, wait out the exposure, and check the histogram. Adjust time or ISO and reshoot until the exposure and the amount of motion blur look right.
Recommended Settings by Scene
| Scene | Filter | Shutter Speed | Effect |
|---|---|---|---|
| Waterfall in shade | 3-6 stop ND | 0.5 – 2s | Silky but textured water |
| Ocean surf, soft light | 6-10 stop ND | 2 – 30s | Misty, smoothed sea |
| Moving clouds, daylight | 10 stop ND | 30 – 120s | Streaked dramatic sky |
| City light trails, dusk | None or 3-stop | 10 – 30s | Car light streaks |
| Star trails, night | None | 15+ min (stacked) | Circular star arcs |
Common Mistakes and How to Avoid Them
The usual culprits behind disappointing long exposures: forgetting to switch to manual focus after composing, which causes the lens to refocus through the dark filter; leaving image stabilization on while tripod-mounted, which can introduce a feedback wobble; ignoring wind, which vibrates the tripod over a long shutter; and color casts from cheaper ND filters, which add a magenta or blue tint you must correct in post. Use the histogram rather than the rear screen brightness to judge exposure, since the screen lies in changing light.
Finishing in Post
Long exposures often need a white balance correction to remove filter color casts; a custom white balance or a quick tweak of the temperature and tint sliders fixes most of it. Recover any blown highlights in the water or sky, add contrast to the static elements, and consider a subtle dehaze. For very long or stacked exposures, noise reduction and removing hot pixels cleans up the final frame.
Frequently Asked Questions
What ND filter strength should I buy first?
A 6-stop ND is the most versatile starting point for silky water and moving clouds in soft light. Add a 10-stop next for daylight long exposures and dramatic skies.
Do I need an expensive filter?
Cheaper filters work but often add a color cast and reduce sharpness. Mid-range and premium ND filters hold neutral color and edge-to-edge sharpness better, which saves time in post. It is worth investing once you know you enjoy the technique.
Can I do long exposure without a filter?
Yes, in low light such as dusk, dawn, or night, the scene is already dark enough for slow shutter speeds. Filters are mainly needed to slow the shutter in daylight.
Why is my long exposure blurry everywhere, not just the water?
Camera movement. Check that your tripod is stable, image stabilization is off, you used a remote or self-timer, and wind is not shaking the rig.
What is a variable ND filter?
A single filter you rotate to change density across a range of stops. It is convenient for video and quick adjustments but can produce an X-shaped dark band at extreme settings on wide lenses, so dedicated fixed NDs remain the choice for critical stills.
Browse more nature photography tutorials, gear reviews, and field tips.