
Summer opens up a completely different world of nature photography opportunities compared to any other season – longer golden hours, heat haze over prairies, thunderstorm light, wildflower meadows at peak, and incredible insect and bird activity. The gear demands also change: heat, humidity, bright harsh light, and the need for lighter backpacking setups all factor into what you bring. This guide covers summer nature photography from planning to the right kit, for 2026.
What Makes Summer Nature Photography Unique
- Extended golden hour: Near the summer solstice at higher latitudes, golden hour can last 90+ minutes in the evening – extraordinary light for extended landscape sessions
- Harsh midday light: The flip side: midday sun in summer is brutally flat and contrasty. Professional nature photographers typically rest between 10am and 3pm in summer, shooting intensively in the morning and evening
- Thunderstorm and dramatic weather: Summer convective storms produce some of the most dramatic landscape photography opportunities of the year – but also the most dangerous conditions for gear and photographers
- Peak insect and small wildlife activity: Butterflies, dragonflies, frogs, and small mammals are at peak activity and visibility in summer
- Heat and humidity challenges: High humidity can fog lenses when moving from air conditioning to outdoor heat; heat can affect battery performance and sensor noise in extreme conditions
Best Locations for Summer Nature Photography in the US
- Rocky Mountain National Park, Colorado: Wildflower meadows at elevation peak in July; avoid crowds by hiking above 10,000 feet
- Great Smoky Mountains, Tennessee/North Carolina: Lightning bugs (synchronous fireflies) in June – a unique and spectacular photographic phenomenon
- Palouse, Washington: Rolling golden wheat hills at peak color in late June/July; extraordinary light-painting landscapes
- Shenandoah National Park, Virginia: Summer wildflowers along Skyline Drive; dramatic thunderstorm light over the valley
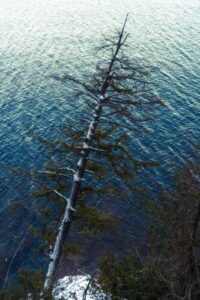
- Boundary Waters Canoe Area, Minnesota: Late summer loons with chicks, boreal forest light, extraordinary night sky access from the canoe route
- Michigan’s Upper Peninsula: Pictured Rocks National Lakeshore, waterfalls at peak flow in June, black bear photography opportunities
Summer Photography Gear Essentials
Camera Body: Heat and Humidity Resistance
Summer demands weather sealing – not for rain specifically, but for humidity, insects (yes, they enter camera bodies), and condensation from rapid temperature transitions. All the top mirrorless recommendations hold here:
- Sony A7 IV – Weather-sealed, excellent dynamic range for high-contrast summer scenes
- Sony A6700 – Sealed APS-C with reach advantage for insect and bird photography; lighter for summer hiking
- Canon EOS R8 – Full-frame quality at a budget price; note limited weather resistance
Key Lenses for Summer Nature Photography
Macro Lens – Essential for Summer Insect Photography
Summer is macro season. Butterflies, dragonflies, bee pollinators on wildflowers, and water insects are all uniquely active and approachable. A dedicated macro lens is the right tool:
- Sony FE 90mm f/2.8 Macro G OSS – Outstanding insect macro; OSS helps hand-held in flower patches
- Nikon Z MC 105mm f/2.8 VR S – Beautiful bokeh and sharpness; excellent for butterfly portraits
Telephoto for Summer Wildlife
- Sony FE 200–600mm G OSS – For summer fawns, bear cubs, fledgling birds, and reptiles at range
ND Filters: Critical for Summer Daylight
Summer’s bright light makes long-exposure landscape work (waterfalls, flowing streams) impossible without strong ND filtration. A 6-stop and 10-stop ND set is ideal. The Breakthrough Photography X4 6-Stop ND and Lee Big Stopper are the right combination.
Hydration and Weather Safety Gear
Summer heat makes hydration critical for multi-hour sessions. A hydration-compatible camera bag (most quality hiking camera bags have hydration bladder sleeves) keeps water accessible without stopping. Carry a reliable weather app – summer thunderstorms develop rapidly and lightning near exposed ridges and water is genuinely dangerous.
- Shimoda Explore V2 35L – Hydration-compatible hiking camera bag with weather-resistant materials
- Platypus Hoser 2L Hydration System – Lightweight bladder for adding water carry to any camera bag
Handling Summer Heat and Humidity
Condensation Management
Moving from an air-conditioned vehicle or cabin to summer outdoor heat causes immediate condensation on cold glass elements. Warm your camera gradually: take it out in a sealed bag and let it acclimate for 15–20 minutes before opening. Clean condensation from filters – it looks like blur in long exposures.
Heat and Battery Performance
Extreme heat (35°C+) can slightly reduce battery life and, in very rare cases, trigger overheating protection in video-capable bodies during 4K recording. Keep spare batteries out of direct sun – insulate them in a light-colored bag section. Avoid leaving camera gear in a closed car in summer heat (interiors reach 60–70°C quickly).
Summer Wildlife Photography Calendar
- June: Fledgling songbirds, synchronized fireflies, wildflower peak at lower elevation
- July: High-elevation wildflower peak, bear cubs active with mothers, shorebird southward migration begins late July
- August: Hummingbird migration south begins, mule deer velvet antlers, late-summer thunderstorm light
Frequently Asked Questions
Summer Macro Photography: Insects, Wildflowers, and Small Worlds
Summer is the peak season for macro photography in temperate climates. The diversity of subject matter – bees on wildflowers, dragonflies at ponds, beetles on bark, spiders in dew-covered webs, and dozens of butterfly species – is simply unmatched in any other season. The challenge is that summer macro subjects are also at their most active, requiring specific technique and timing to capture sharp images.
Timing for Insect Macro
The single most effective technique for sharp insect macro photography is shooting early in the morning, within the first hour or two of sunrise, before temperatures climb. Insects are cold-blooded (ectothermic), meaning their activity level scales directly with ambient temperature. At 55–65°F (13–18°C), bees, butterflies, and dragonflies are sluggish and easy to approach. By 80°F (27°C), most are highly active and unpredictable – excellent for behavioral shots but far more difficult for deliberate macro work.
Morning dew is a bonus: many macro photographers specifically seek out dewy subjects at first light. Water droplets on butterfly wings, spider webs, and grass blades create spectacular abstract macro opportunities while the subjects remain still. Check predicted overnight lows – nights that drop below 60°F typically produce better dew conditions than warm, humid nights.
Flash and Light Diffusion for Macro
Summer midday light is too harsh for most macro photography – the contrast is extreme and shadows are deep and unflattering. Even in morning light, a ring flash or a twin macro flash system dramatically improves results by providing controllable, soft illumination regardless of ambient conditions. The twin flash approach (two small flash heads mounted on articulating arms around the lens) lets you position light at any angle – from directly frontal (for even illumination of complex subjects like flies) to strongly directional (for dramatic shadows on textured surfaces like beetles).
If you don’t have a dedicated macro flash, a small diffuser over your pop-up flash or external speedlight makes a substantial difference. Even a piece of white tissue paper over the flash head reduces harsh macro shadows considerably. Dedicated macro diffusers (Lastolite Macro Softbox, MagMod MagSphere) are more elegant solutions that attach directly to your flash unit.
Depth of Field in Macro: Managing the Impossible
At 1:1 macro magnification, depth of field is measured in millimeters – at f/11, you may have only 3–4mm of sharp focus across a subject. This is genuinely challenging for shooting a butterfly face-on (the eye, proboscis, and antennae are all at different distances from the lens) or an insect at a 3/4 angle. Techniques for managing macro depth of field:
- Parallel plane shooting: Position yourself so the camera sensor plane is parallel to the primary plane of the subject. For a butterfly with open wings, this means shooting exactly side-on so both wings are at equal distance. For a bee on a flower, approach from directly in front so the eye plane is perpendicular to the lens.
- Focus stacking: For stationary or slow-moving subjects (dewy early morning is ideal), shoot multiple frames at different focus distances and merge them in Helicon Focus or Photoshop’s Auto-Blend Layers. 5–15 frames per stack is typical for detailed insect close-ups; some photographers use 50+ frames for extreme close-ups like compound eye detail.
- Stopping down: f/11–f/16 gives more depth of field at the cost of diffraction softening. For handheld macro, f/8–f/11 often yields the best balance of sharpness and depth of field; f/16+ is better for tripod-mounted focus stacking.
Summer Landscape Photography: Light, Storms, and Green Seasons
Summer landscape photography in North America presents both extraordinary opportunities and significant challenges. The long days mean extended golden hour windows at both ends of the day, but also long stretches of midday light that renders most landscapes flatly and harshly.
Making the Most of Summer Golden Hour
Summer golden hour in northern latitudes can last 45–60 minutes at sunrise and sunset – longer than any other season. The quality of summer golden light is distinct from autumn or spring golden hour: it’s warmer in color temperature (3200–4000K), lower in contrast, and often combined with atmospheric haze from summer humidity and vegetation transpiration that creates beautiful depth in landscapes with layers of ridges or mountains.
Summer sunrise is early – often 5:00–5:45am in northern states. Getting to your location before first light means starting before 4am for many mountain or coastal locations, accounting for drive time and a hike to your preferred vantage point. The reward is often empty parking lots and no other photographers at popular sunrise locations, plus the opportunity to shoot blue hour before golden hour begins.
Summer Thunderstorm Photography
Summer thunderstorm light is among the most dramatic in photography. The combination of dark storm clouds, shafts of directional light breaking through gaps, double rainbows after passing cells, and lightning strikes produces images with immediate visual impact. Safely photographing summer storms requires understanding convective weather – specifically knowing whether storms are building toward you, moving parallel, or dissipating. The Storm Prediction Center (spc.noaa.gov) and apps like RadarScope provide the granular, real-time data needed to position yourself safely relative to storm cells.
For lightning photography, use a lightning trigger (Miops Smart, Pluto Trigger) that uses a light sensor to detect the flash and trigger the shutter faster than human reaction time. Set up on a tripod, use a remote release, and position yourself at least 8–10 miles from the storm’s core – lightning can travel horizontally far beyond the visible storm cell boundary.
Summer Photography Locations: Going Beyond the Obvious
The most-photographed summer nature locations – Yosemite Valley, Rocky Mountain National Park’s Trail Ridge Road, Acadia’s Thunder Hole – are genuinely spectacular but also genuinely crowded in summer. Alternative strategies for strong summer photography results with less competition:
National Forests vs. National Parks
Adjacent national forests often provide access to comparable scenery with a fraction of the visitor traffic. The Inyo National Forest bordering Yosemite, the Arapaho and Roosevelt National Forests adjacent to Rocky Mountain NP, and the Tongass National Forest in southeast Alaska all offer world-class photography with far less competition for parking and sunrise locations. The tradeoff is less infrastructure – pit toilets rather than restrooms, rougher roads, and no ranger programs. For serious landscape photographers, this is usually a feature, not a bug.
State and County Parks for Macro and Wildflower
Native prairie remnants, bog preserves, and state wildflower areas often host native wildflower species that are locally rare and not present in high-traffic national parks. The Nature Conservancy’s preserve network, state natural areas programs, and local native plant societies are excellent resources for finding high-quality macro and wildflower photography locations that most landscape photographers overlook. Many of these sites are tiny (under 50 acres) but support dozens of rare or unusual native plant species.
When is the best time to photograph wildlife in summer?
Dawn and the first two hours after sunrise are the most productive summer wildlife photography windows. Most mammals and many bird species are most active in early morning before heat increases. Evening golden hour (last 90 minutes before sunset) is the second best window. Midday summer heat reduces wildlife movement significantly and produces the least attractive light for photography.
What camera settings work best for photographing butterflies and insects?
For hand-held insect macro photography: use a fast shutter speed (1/500s+) to freeze any movement, wide aperture (f/4–f/5.6 for some depth of field at macro distances), and Auto ISO up to 3200 to maintain exposure. Work with a macro lens at 90–105mm for adequate working distance from shy subjects. Early morning when insects are cool and less active is the easiest time to approach closely.
Is it safe to photograph near thunderstorms in summer?
Lightning photography is popular but requires careful risk management. Never be the highest point in an exposed area during a storm. Photograph from inside a vehicle or a building rather than from an exposed ridge or field. The ideal position is looking at an approaching or receding storm from a safe, sheltered location with a clear view of the sky.
What wildflowers are best for summer photography in North America?
Summer wildflower photography peaks at different times and locations across the continent. In the Rocky Mountains, July–August brings peak alpine wildflower blooms at elevations above 10,000 feet – Indian paintbrush, columbine, blue columbine, and subalpine larkspur are particularly photogenic. In the Pacific Northwest, July brings peak blooms in the Cascade meadows. The Midwest prairie peak is mid-July for native prairie wildflowers. In the East, summer bog orchids, pitcher plants, and sundews are spectacular macro subjects in June–July. Research bloom timing for your specific region as it shifts by 1–3 weeks depending on snow year and spring temperatures.
How do I avoid heat damage to my camera in summer?
Most mirrorless and DSLR cameras are rated for operation up to 104°F (40°C). In practice, leaving a camera on a dashboard or in a sealed car can exceed 160°F and cause permanent damage. In the field, shade your camera when not shooting using a white or silver camera bag (lighter colors reflect heat better than black). Avoid pointing the lens at the sun in live view for extended periods – mirrorless sensors in live view can accumulate heat quickly. Keep batteries cool (body temperature or cooler), as heat reduces lithium battery capacity significantly. If your camera begins showing an overheating warning, power down and allow it to cool in shade before continuing.
What is the best lens for butterfly photography?
A 100mm macro lens is the traditional choice – it gives 1:1 reproduction at a working distance of about 12 inches, which is close enough for frame-filling shots but far enough not to spook most species. A 180mm macro gives a longer working distance (about 18 inches) for skittish subjects. The 150–600mm telephoto zoom is a useful complement, especially for skippers and other smaller, quicker butterflies that won’t allow close approach. For frame-filling shots of open-wing butterflies in morning light when they’re sluggish, the 100mm macro is ideal; for behavioral shots of active butterflies in flight or feeding, a longer telephoto (300–600mm) works better.
Browse more nature photography tutorials, gear reviews, and field tips.
Download our guide: exposure, ISO, and aperture strategies for every light condition and terrain.
We respect your inbox. One guide, occasional tips, unsubscribe anytime.
Related Guides
 Best Polarizing Filters for Nature Photography (2026): 6 CPL Filters Compared
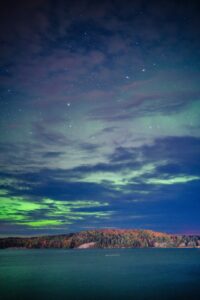 How to Photograph the Milky Way: Settings, Planning & Post-Processing
 Mastering Long Exposure Photography: A Complete Guide to Silky Water & Dramatic Skies
 Best Tripods for Landscape Photography (2026): 7 Picks From Budget to Pro